Introduction
Switching from QuickBooks Online to Xero can feel daunting, but with the right approach, it’s a manageable process that can transform your accounting workflow. Small business owners, accountants, and bookkeepers are increasingly choosing Xero for its intuitive interface, robust integrations, and cost-effective pricing. Whether you’re seeking better scalability or global accessibility, migrating to Xero can unlock new efficiencies. However, ensuring no data loss during the transition is critical to maintaining accurate financial records.
This comprehensive guide will walk you through the process of moving from QuickBooks Online to Xero without losing data. From preparation to post-migration optimization, we’ll cover every step, share actionable tips, and provide resources to make your QuickBooks to Xero migration seamless. Let’s dive in and explore how to make this transition smooth and stress-free.
Why Switch to Xero?
Xero offers compelling reasons for businesses to make the switch from QuickBooks Online. Its cloud-based platform is designed for ease of use, making it a favorite among small businesses and accounting professionals. Here are some key benefits:
- User-Friendly Interface: Xero’s clean dashboard and straightforward navigation reduce the learning curve, even for non-accountants.
- Robust Integrations: Xero connects seamlessly with over 1,000 apps, including payroll, CRM, and e-commerce tools, offering more flexibility than QuickBooks Online.
- Cost-Effective Pricing: Xero’s plans are often more affordable, with transparent pricing that scales with your business.
- Global Accessibility: Xero supports multi-currency transactions and complies with international tax standards, ideal for businesses expanding overseas.
Compared to QuickBooks Online, Xero provides stronger inventory management and project tracking, though QuickBooks may edge out in reporting depth. For many, Xero’s simplicity and integration ecosystem make it the preferred choice. If you’re ready to move QuickBooks Online to Xero, preparation is key to a successful transition.
Preparing for the Migration
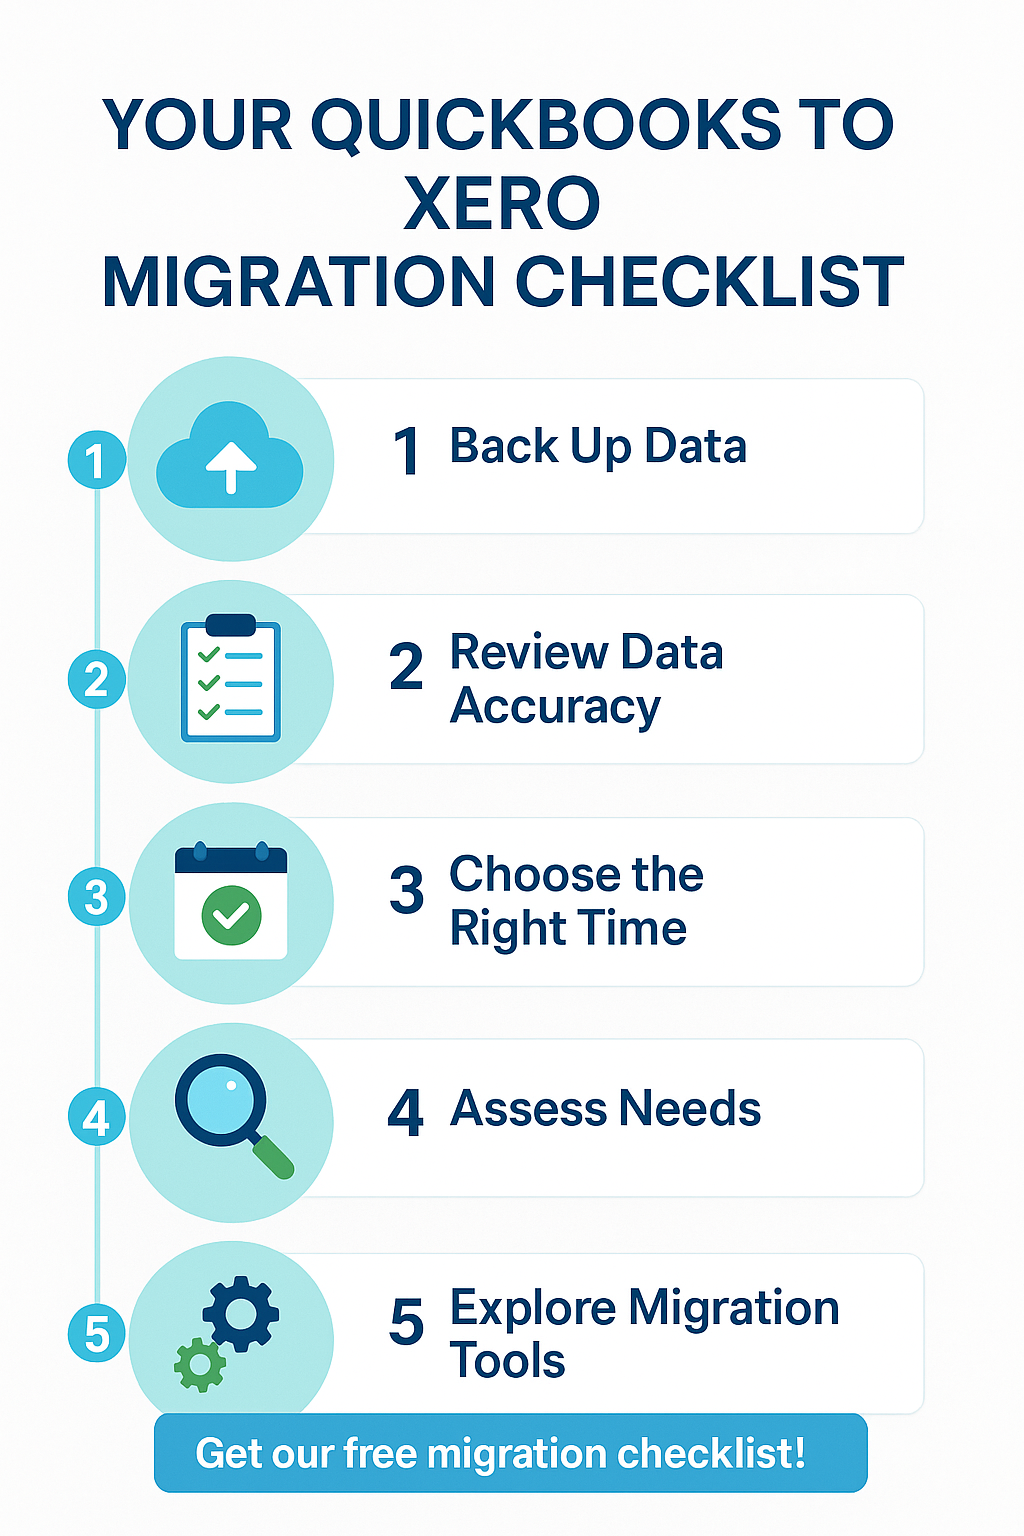
Before you begin the QuickBooks to Xero migration, thorough preparation ensures a smooth process and minimizes the risk of data loss. Here’s how to get started:
- Back Up Your QuickBooks Online Data: Export all financial data, including chart of accounts, invoices, bills, and reports, to a secure location. QuickBooks Online allows you to download data in CSV or Excel format.
- Review Data Accuracy: Check for discrepancies in your QuickBooks records, such as duplicate transactions or incomplete reconciliations. Clean up your books to avoid transferring errors to Xero.
- Choose the Right Time: Schedule the migration during a quiet period, such as after month-end reconciliations or outside peak business hours, to minimize disruptions.
- Assess Your Needs: Decide which data to transfer (e.g., historical transactions, customer lists, vendor details). Note that Xero may not support certain QuickBooks features, like memorized transactions, so plan accordingly.
- Explore Migration Tools: Consider using Xero’s built-in import tools or third-party services like Jet Convert or G-Accon for automated data transfer. These tools streamline the process and reduce manual errors.
Engaging a Xero-certified advisor can also help, especially for complex datasets. For example, a small retail business migrating to Xero used Jet Convert to transfer two years of transaction history, saving hours of manual work. By preparing thoroughly, you set the stage for a successful cloud accounting software transition.
Step-by-Step Guide to Switching
Follow this detailed guide to switch from QuickBooks Online to Xero without losing data. Each step is designed to ensure accuracy and efficiency.
Export Data from QuickBooks Online:
Log in to QuickChooks Online and navigate to the “Reports” section.
Export key reports like the General Ledger, Trial Balance, and Profit & Loss in CSV or Excel format.
Download lists such as Customers, Vendors, and Chart of Accounts from the “Settings” menu.
Tip: Save exports in a clearly labeled folder to stay organized.
Format Data for Xero:
Xero requires specific CSV templates for imports. Download these templates from Xero’s “Import” section.
Map your QuickBooks data to Xero’s fields (e.g., match QuickBooks’ “Account Name” to Xero’s “Account Code”).
Pitfall to Avoid: Incorrect mappings can lead to missing or misaligned data. Double-check field alignments.
Import Data into Xero:
Log in to Xero and go to “Business” > “Import Data.”
Upload your formatted CSV files for each data type (e.g., Chart of Accounts, Invoices).
Follow Xero’s prompts to review and confirm the import.
Tip: Start with the Chart of Accounts, as other data depends on it.
Verify Initial Imports:
Check Xero’s dashboard to ensure data appears correctly (e.g., balances match QuickBooks reports).
Run a sample report, like the Balance Sheet, to spot discrepancies.
Pitfall to Avoid: Don’t proceed with additional imports until the initial data is accurate.
Import Historical Transactions:
Use Xero’s manual import or a third-party tool like Jet Convert to transfer historical transactions.
Ensure dates and amounts align with QuickBooks records.
Tip: Limit historical data to 1–2 years unless required, as older data can slow the process.
Reconcile and Test:
Reconcile bank accounts in Xero to confirm transaction accuracy.
Test workflows like creating an invoice or paying a bill to ensure functionality.
Example: A freelance graphic designer tested Xero’s invoicing feature post-migration and caught a formatting error before it impacted clients.
Ensuring No Data Loss
Data integrity is the cornerstone of a successful QuickBooks to Xero migration. After importing your data, follow these best practices to ensure nothing is lost:
- Reconcile Accounts: Compare Xero’s bank balances, accounts receivable, and accounts payable with QuickBooks Online reports. Any mismatches indicate missing or incorrect data.
- Run Key Reports: Generate Xero’s Trial Balance, Profit & Loss, and Balance Sheet. Cross-reference these with QuickBooks to confirm consistency.
- Check Transaction Details: Spot-check invoices, bills, and journal entries in Xero to verify details like dates, amounts, and categories.
- Test Workflows: Create a test invoice or bill in Xero to ensure customer and vendor data transferred correctly. This step catches issues like missing contacts.
- Back Up Xero Data: After verifying, export Xero’s data as a precaution. This ensures you have a recovery point if issues arise later.
If discrepancies persist, a Xero-certified advisor can help troubleshoot. For instance, a small e-commerce business found mismatched inventory data post-migration but resolved it by re-importing a corrected CSV file. Taking time to verify data ensures your financial records remain accurate and reliable.
Post-Migration Tips
Once you’ve successfully moved QuickBooks Online to Xero, optimize your setup to maximize efficiency:
- Customize Your Chart of Accounts: Tailor Xero’s accounts to match your business needs, such as adding specific expense categories.
- Set Up Integrations: Connect Xero to tools like Shopify, PayPal, or HubSpot to streamline workflows. Explore Xero’s App Marketplace for options.
- Train Your Team: Use Xero’s free online training or webinars to familiarize staff with the platform. This reduces errors and boosts adoption.
- Leverage Automation: Enable Xero’s bank feeds and auto-reconciliation features to save time on manual entries.
- Monitor Performance: Regularly review Xero’s financial reports to gain insights and make data-driven decisions.
Conclusion
Switching from QuickBooks Online to Xero doesn’t have to be overwhelming. With careful preparation, a clear step-by-step process, and thorough verification, you can move QuickBooks Online to Xero without losing data. By following this guide, you’ll ensure a seamless cloud accounting software transition that sets your business up for success in 2025 and beyond.
Ready to make the switch? Explore our Xero setup guides or contact us with our cloud accounting experts to streamline your migration. Start your Xero journey today!